Your hand is cramping from scribbling notes. The interviewee just said something fascinating, but you missed half of it because you were still writing down the previous quote. You get back to your desk with 15 pages of barely legible notes and no clear recollection of the nuances in how people actually said things. Sound familiar?
Or maybe you've already switched to audio recordings, but are now faced with the daunting task of transcribing them. Do you do that yourself, or do you turn to an outsourced service provider (or research assistant / junior consultant...)? Or maybe you already have the transcripts coded, and are now wondering how to turn those long text files into meaningful insights? Many teams also work with Zoom or Teams call recordings from customer discovery sessions, where the same workflow applies.
This guide walks through a practical, tested setup based on what is possible in 2026 using modern tools. It works whether you are conducting 5 interviews or 50.
Before going into the workflow for effective researcher-led interviews, it's worth noting that with tools like Skimle Ask (AI-assisted smart interviewer) it is now also possible to also gather broader samples using chat and voice based smart interviewers. These will never replace the richness of human interviews, but can be a helpful tool to collect insights at scale to bridge the gap between qualitative and quantitative studies.
A modern, practical end-to-end interview workflow
The setup we describe here balances quality, efficiency, and practicality. It uses tools that most people already own, does not require expensive equipment, and produces results that meet professional standards. Now, we have purposely kept this accessible and easy to use, and for some experts already deep in the topic it might be slightly too simplistic. But it works.
Here is the overview:
- Record audio using your iPhone or Android phone's built-in voice recorder
- Transfer and organise recordings to your computer with proper naming and backup
- Transcribe automatically using AI transcription services
- Review and sanitise transcripts to ensure accuracy and remove sensitive information
- Analyse systematically using AI-assisted qualitative analysis tools
- Refine and export findings in formats suited to your audience
The workflow is both rigorous and efficient, allowing you to spend interview time actually interviewing, not frantically scribbling notes. You get complete, accurate transcripts instead of partial memories and can analyse systematically across all interviews instead of relying on what you happen to remember.
The entire setup costs nothing beyond tools you likely already have (or free alternatives exist). The time investment to learn the workflow pays back immediately in the first interview you conduct.
Let's walk through each step in detail.
Step 1: Recording with your phone
Modern smartphones contain remarkably good microphones. In many cases you do not need expensive recording equipment to capture clear interview audio suitable for transcription.
Basic setup
If you have an iPhone, use the built-in Voice Memos app (the icon looks like sound waves). Android users can use the built-in Voice Recorder or Google Recorder app. These apps are designed specifically for voice recording and handle the technical details automatically.
Test the application before the interview begins. Push the red record button to start a test recording. Speak at normal volume from where you will be sitting during the interview, and then separately from where the interviewee will be sitting. Play it back to check the audio quality. If you can clearly understand every word, the setup is adequate.
Starting the interview:
Place your iPhone on the table between you and the interviewee, with the microphone end (usually the bottom of the phone) pointing toward the interviewee. Most people point the top of the phone toward the speaker, but the microphone is actually at the bottom. If the interviewee moves around the room, politely ask them to stay seated so the microphone can pick up their voice clearly.
You need consent and agreement from the interviewee to use audio recording. In some cases (like academic research settings or journalistic interviews) this is expected and adheres to cultural norms. In other settings like management interviews on sensitive topics by a trusted counsel consultant you really need to explain well why you want to record, how you will use the recordings, how privacy will be protected (who can listen to the files, how you delete the files and so on) and what your setup will be. And sometimes there are setting where recording is simply not going to happen, even though with tools like AI notetakers on Teams calls being more and more prevalent, people are getting more used to being recorded.
Audio quality tips
Small adjustments to your recording environment make a significant difference to transcription accuracy.
Manage background noise. Close windows if there is traffic noise. Turn off air conditioning or fans if possible. Choose a quiet conference room rather than a busy coffee shop. Background noise does not just make recordings harder to transcribe manually; it also reduces AI transcription accuracy.
Address echo and reverberation. Empty rooms with hard surfaces create echo that muddies recordings. If you are in a stark conference room, move to a room with carpet, curtains, drapes, or upholstered furniture. These soft materials absorb sound and create clearer recordings. If you must use an echoey room, position yourself and the interviewee closer together and speak slightly more quietly than normal.
Watch your distance. The sweet spot is 30-60 centimetres (roughly one to two feet) between the phone and the speaker's mouth. Closer than 30 centimetres risks distortion from loud sounds. Further than one metre and the phone struggles to separate voice from background noise, especially if the person speaks quietly.
Prevent microphone obstruction. Do not place papers or objects over the phone during the interview. If you are taking supplementary notes, put your notepad to the side. A coffee cup placed directly in front of the microphone can muffle audio.
Ask people to speak clearly. Most people naturally speak more clearly when they know they are being recorded. You do not need to be prescriptive, but mentioning "I'm recording so I can focus on our conversation rather than taking notes" often prompts clearer articulation.
Upgrading to dedicated microphones
If you conduct interviews frequently or need broadcast-quality recordings, dedicated USB microphones produce noticeably better results than phone microphones.
The RØDE NT-USB Mini (around 110 EUR) connects to laptops via USB and provides studio-quality recording for interviews. The Yeti (around 100 EUR) offers multiple pickup patterns, letting you optimise for single-person or multi-person interviews. For mobile recording with substantially better quality than phone microphones, RØDE's Wireless GO II (around 250 EUR) includes two small microphones that clip to clothing and transmit wirelessly to a receiver you connect to your phone or laptop.
These dedicated microphones matter most when you are recording in challenging acoustic environments where phone microphones struggle, have multiple interviewees or are interviewing in less common languages where AI performs less well with lower-quality audio. For most professional interviews, phone recording is entirely adequate. Invest in better equipment only if phone recordings consistently produce problems.
Step 2: Transfer, organise and secure your recordings
Immediately after each interview, transfer the recording from your phone to a secure location on your computer or cloud storage. This prevents accidentally deleted recordings and starts building your organised project archive.
Transfer from iPhone to Mac
The fastest method is AirDrop. On your iPhone, open Voice Memos, tap the recording, tap the three dots menu, and select "Share". Choose your Mac from the AirDrop options. The file appears in your Downloads folder.
Alternative methods include:
- iCloud sync: Voice Memos automatically sync across Apple devices if you enable iCloud. Recordings appear in the Voice Memos app on your Mac.
- USB cable: Connect your phone to your computer with a cable
- Email: For short recordings, you can email them to yourself, though this is slower and limited by email attachment size limits and security concerns
Organising your files
Create a dedicated project folder on your computer for the research. Within that folder, create subfolders:
Project_Name/
  01_Audio_Recordings/
  02_Transcripts/
  03_Analysis/
  04_Outputs/
Save each audio recording with a consistent naming scheme. Good options:
- If using real names (for identified research):
2026-01-22_Interview_Olli_Salo.m4a - If using codes (for anonymised research):
2026-01-22_Interview_P01.m4awhere P01 is the participant code - For expert interviews:
2026-01-22_Expert_TechIndustry_01.m4aindicating topic and sequence
The date prefix (YYYY-MM-DD format) automatically sorts files chronologically. Consistent naming makes analysis easier when you are working with dozens of interviews.
Do not leave files with default names like "Recording 1.m4a". You will forget who this was within a week. Trust me, I've done this many times :)
Backup and security
Interview recordings often contain sensitive or confidential information. Proper data handling is both an ethical requirement and a practical necessity.
Cloud backup: Store your project folder in a secure cloud service. Dropbox, Google Drive, OneDrive, or iCloud all provide automatic backup. This protects against computer failure and allows access from multiple devices.
For sensitive research, consider:
- Enabling two-factor authentication on your cloud account
- Using your organisation's institutional cloud storage rather than personal accounts
- Encrypting the folder containing recordings before uploading to cloud storage (tools like VeraCrypt provide this)
Follow institutional guidelines. Many universities and organisations have specific requirements for handling research data, especially when interviews contain personal information. Check whether you need to:
- Store data only on approved institutional servers
- Encrypt all interview files
- Limit access to specific named individuals
- Delete recordings after a specified retention period
GDPR and data protection. If you are conducting research in Europe or with EU residents, GDPR requires explicit consent for recording and processing interview data, clear explanation of how data will be stored and used, and appropriate technical security measures. Document your consent process and follow through on promises made to participants.
Consent documentation. Store signed consent forms (physical or electronic) separate from interview recordings. Create a master spreadsheet linking participant codes to consent documentation so you can prove appropriate consent if required later.
Deletion from phone. After verifying the file transferred successfully and you can play it on your computer, delete the recording from your phone. Phones have limited storage. More importantly, keeping interview recordings on a device you carry creates unnecessary security risk if your phone is lost or stolen.
Step 3: Transcribe your recordings with AI tools
Manual transcription is painful. Typing out one hour of interview audio can take 4+ hours for experienced transcribers. This means the services doing this manually are typically also quite expensive even if transcription is handled in a low-cost country.
AI-assisted transcription is starting to have good quality in 2026 and should be the default approach to at least try first. For some languages and dialects it still doesn't work perfectly, but for most interviews it produces outputs at reasonable quality that doesn't hinder the analysis. You can also always go back to the source audio files to double check key quotes that you e.g., plan to use verbatim in the end product.
Turn audio to text with Skimle's integrated transcription
The simplest approach is to use Skimle's built-in transcription when you are planning to analyse the interviews with Skimle anyway.
Create a free Trial account in Skimle and on the home screen open the panel on the left and choose Transcripts. Select the audio files from your drive and upload. Each minute of transcription costs a token, so even with the free trial account you can do a lot of transcriptions to start with.
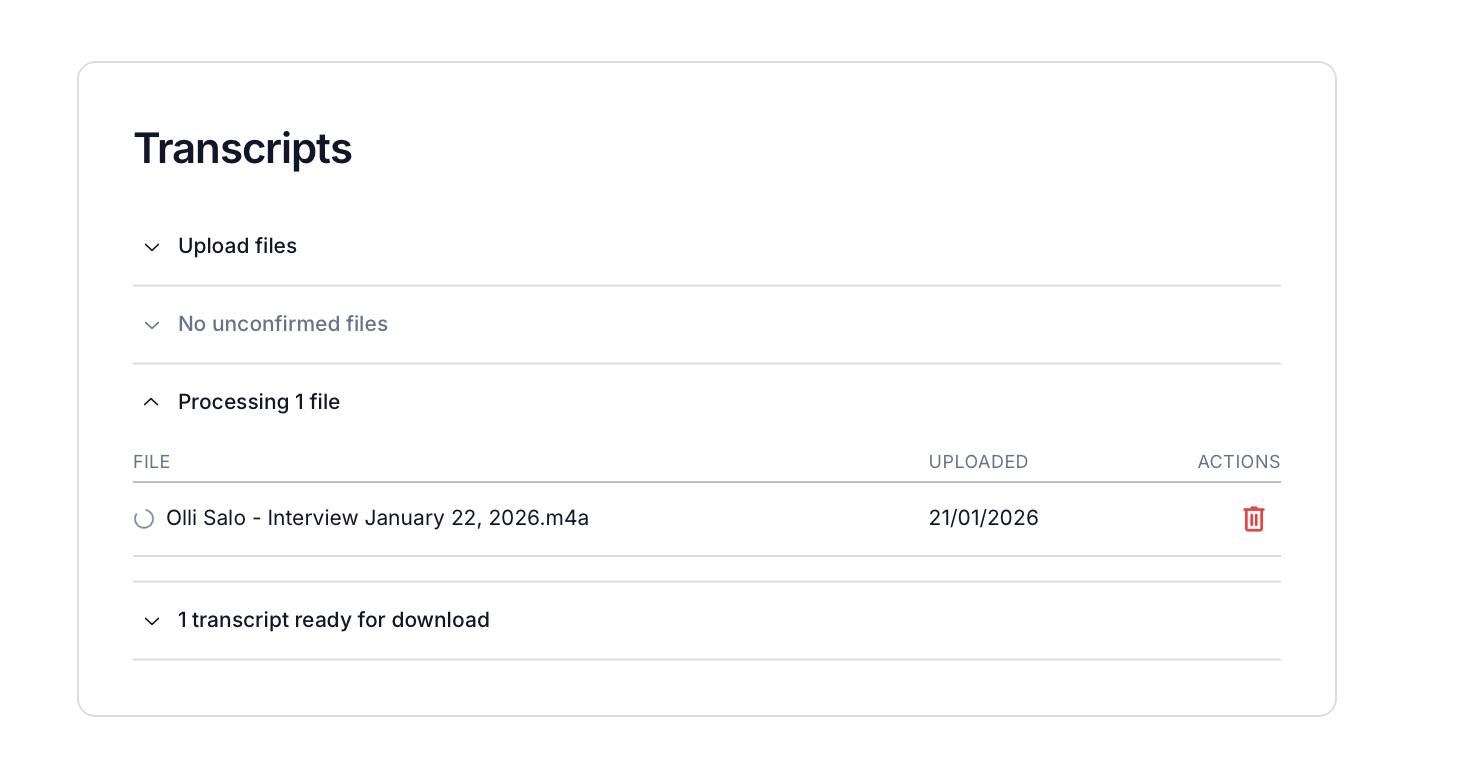
Skimle transcribes them automatically using high-accuracy speech recognition. For a typical one-hour interview, transcription completes in less than 5 minutes. After the transcription is ready, it will appear under "Transcript ready for download" section. Download the ready files to your folder structure.
Skimle handles multiple languages automatically, making it suitable for international research projects. The service processes audio securely and does not use your data to train AI models. The transcripts are formatted with timestamps and speaker labels where the system can distinguish multiple voices.
Backup option: OpenAI Whisper run locally
If you are forced (e.g., by institutional policy) to run transcription on your own computer without sending audio files to external services, OpenAI's Whisper is the best current open-source speech recognition software.
Whisper runs on Mac, Windows, or Linux. You need to install Python first (download from python.org), then install Whisper using:
pip install openai-whisper
Transcribe an audio file by running:
whisper audio_file.m4a --model medium --language en
This creates a text file with the transcript in the same folder as your audio file.
Running Whisper locally means your audio never leaves your computer, which is ideal for highly sensitive interviews. The downside is that transcription takes longer (roughly real-time for medium model, meaning a one-hour interview takes about one hour to transcribe). You also need reasonable computer specifications; transcription is much faster with a modern processor. For detailed Whisper setup instructions, see OpenAI's documentation.
Step 4: Review and sanitise your transcripts
Before analysis, it is time to read through the transcripts from three different lenses:
- Understanding the data. Reading through all interview transcripts is the first step of what Braun and Clarke describe as familiarisation in thematic analysis methodology. You are taking control of your data, understanding its contents, and ensuring quality.
- Checking for errors. AI transcription is not perfect. AI transcription often mishears company names, product names, technical jargon, and acronyms. If your interviewee works at "Acme Corporation" but the transcript says "Hakme Corporation", correct it. If they mention a product called "SalesPro" but the transcript says "sales pro", fix the capitalisation. You do not need perfect transcription. An error rate of 2-5% is acceptable for qualitative analysis, as you will be working with meaning and themes rather than analysing specific word frequencies. Spend 10-15 minutes per transcript on quality checks rather than aiming for perfection.
- Sanitising data if needed. Depending on your context, you might need to remove personal identifiers (e.g., names, titles or company names) as well as sensitive data like health, financials, legal matters, mentions of 3rd parties not consenting to research etc.
Anonymising and pseudonymising transcripts systematically
Manual find-and-replace misses more than you think. Direct identifiers like names are the obvious ones, but indirect identifiers are just as real: "as the only female partner at the firm", "the CEO who led the 2019 merger", "our office in Tampere". A participant promised anonymity can still be re-identified from a combination of role, location, and event references even after their name has been removed.
Skimle Anonymise is a purpose-built pseudonymisation and anonymisation workspace that handles this systematically. Upload your transcripts and the tool detects identifiers across six categories — names, titles and roles, locations, organisations, dates, and other — then lets you apply transformation rules per category: pseudonymise, generalise, approximate, or redact. Three preset protection levels cover the main compliance scenarios, from basic pseudonymisation with a re-identification key to full anonymisation intended for HIPAA compliance.
Cross-file consistency is particularly useful when working with a corpus of 10-20 interviews: the same person gets the same pseudonym across all documents, so analytical coherence is preserved. The export includes anonymised DOCX files, an Excel translation table, and a PDF audit report documenting all transformations — which satisfies most IRB documentation requirements and is useful for methods sections.
Skimle Anonymise is included in all Skimle plans, so if you are already using Skimle for transcription and analysis, no additional setup is needed.
In academic research you often want to keep two sets of data: the original transcripts (retained securely for legal or research record purposes) and the pseudonymised versions used for analysis and sharing. Create a clear note explaining the logic for all changes as an audit trail. Skimle's PDF audit report handles this automatically.
Step 5: Upload to Skimle for systematic, AI-assisted analysis
With clean, verified transcripts in hand, you are ready for actual analysis. This is where proper AI-assisted qualitative analysis transforms your workflow from weeks of manual work to days of focused interpretation. While some have attempted to take shortcuts and just use chatbots like ChatGPT for qualitative analysis, it's better to stick to rigorous workflows to ensure quality, two-way transparency, repeatability and no hallucinations.
With the same Skimle account used for the transcription step, you can create a new project for the analysis and upload the files.
What Skimle does is perform a systematic qualitative analysis on the interview transcript.
Reads each transcript systematically using hundreds of micro-AI calls to understand the meaning of each passage and identify insights. This structured approach mirrors how experienced researchers do thematic analysis, but automated.
Creates categories and themes across all interviews. Instead of coding each interview separately and trying to remember what categories you used in previous ones, Skimle builds a unified category structure that evolves as it processes each transcript. Categories start broad and automatically split into more specific sub-categories as patterns emerge.
Links every insight to source quotes. Unlike ChatGPT-style document chat where answers change each time you ask, Skimle maintains permanent, traceable connections between themes and the specific quotes that support them. You can click any theme and see every relevant passage from every interview.
Creates the Skimle table This spreadsheet-like view shows interviews as rows and themes as columns, with each cell showing what that interviewee said about that theme. This visual structure makes it easy to compare perspectives across interviews, identify where people agree or disagree, and spot patterns across demographic segments.
Processing typically takes about 10 minutes for a project with 20-30 interviews. During this time, you can continue working. Skimle sends a notification when analysis is complete.
You maintain full control throughout. If the AI creates categories that do not match your research framework, merge or split them. If quotes are miscategorised, move them. If you want different categories than what the AI suggested, create them manually and ask the AI to recode using your structure.
Step 6: Refine the analysis and create deliverables
With your interviews systematically coded and organised, the final step is interpretation and presentation.
Explore your data interactively
Use Skimle's Category View to drill into each theme. See summaries of what people said, read the most insightful quotes, and understand the range of perspectives within each category.
Use the AI Chat feature to ask specific questions across your interview set: "What did healthcare professionals say about burnout?" or "How do responses about remote work differ between managers and individual contributors?" The AI answers based on the structured analysis it created, giving consistent, comprehensive responses with quotes and source references.
Compare segments using metadata filters. If you tagged interviews with demographic information (role, department, years of experience), compare how themes differ across groups. This reveals whether certain concerns are universal or specific to particular populations.
Export for different audiences
Create outputs tailored to your audience using Skimle's export options.
PowerPoint presentations work well for executive stakeholders. Export creates slides with key themes, summaries, and supporting quotes formatted for presentation. You add your strategic interpretation and recommendations around this evidence-based foundation.
Word reports provide comprehensive documentation suitable for research papers, detailed client reports, or organisational records. The export includes table of contents, executive summaries, full category hierarchies, and all relevant quotes organised by theme.
Excel spreadsheets export the Skimle table structure, useful when stakeholders want to filter and analyse the data themselves or when you need to merge qualitative findings with quantitative data.
For academic researchers, these exports form the foundation for methods sections and results chapters. For consultants, they provide evidence-based client deliverables. For market researchers, they turn customer voice into product roadmap input.
Have your say!
Test the workflow above for your next interview, and let us know how it worked! Also, if you have ideas on what to change, experience on great audio recording devices, practical tips and trick or war stories, do share them with Skimle so we can keep updating the guide!
Ready to transform your interview workflow? Try Skimle for free and experience systematic transcription and AI-assisted analysis with full transparency from every insight back to source quotes.
Want to improve your interviewing technique? Read our guide on how to conduct effective business interviews and learn how to write the perfect interview guide.
About the authors
Henri Schildt is a Professor of Strategy at Aalto University School of Business and co-founder of Skimle. He has published over a dozen peer-reviewed articles using qualitative methods, including work in Academy of Management Journal, Organisation Science, and Strategic Management Journal. His research focuses on organisational strategy, innovation, and qualitative methodology. Google Scholar profile
Olli Salo is a former Partner at McKinsey & Company where he spent 18 years helping clients understand the markets and themselves, develop winning strategies and improve their operating models. He has done over 1000 client interviews and published over 10 articles on McKinsey.com and beyond. LinkedIn profile